Quitabug Handmades- Home
Shop Now
Order 24/7
Join my Team
Paper Pumpkin
Classes and Events
Videos and Projects
Videos
Image Map

Wednesday, November 8, 2023

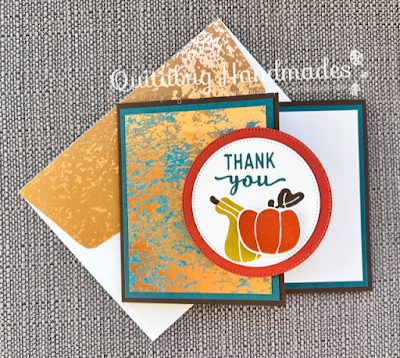
Thank You, Beyond Grateful


Hey there! I have a simple fun fold card idea to share with you today. This card is very easy to create and it also packs some "wow" 😍 factor with the fabulous Oxidized Copper Specialty Paper. I used the Pick of the Patch Bundle for the cute little pumpkins and found my sentiments in the Charming Sentiments stamp set.

Host Code-V9BPW249
Click the button below to shop.

Watch the video tutorial below for step by step instructions or CLICK HERE.


Early Espresso card base 4.25" x 11" scored at 5.5" 
(cut 2" off of card front- see video)
Pretty Peacock cardstock 4" x 5.25" and 3.25" x 4"
Basic White cardstock 3.75" x 5"
Oxidized Copper DSP 3" x 3.75"


NOTE: If viewing this blog post from an email, CLICK HERE to view with full supply list.

Happening Now
♥ Shop Stampin' Up! HERE
♥ Sign Up for my Weekly Newsletter HERE
♥ Join My Team of Quitabug Stampers HERE
♥ Subscribe to Paper Pumpkin HERE

Shop Now Join my Team Paper Pumpkin Image Map

Saturday, November 4, 2023

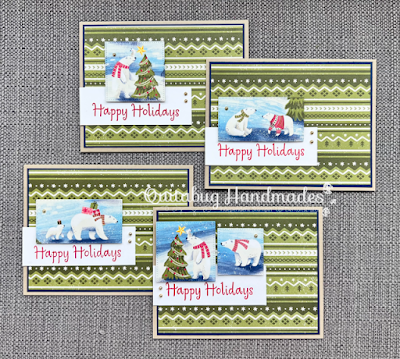
Happy Holidays


Happy Saturday! I have a simple but cute Christmas card to share with you today. To create this card, I paired the Beary Christmas Designer Series Paper with a sentiment from the Throughout the Year Stamp Set. I die cut this cute bear scene from the Beary Christmas DSP using the Stylish Shapes dies and it makes the perfect focal piece. The designer paper truly does all the work on this card!

Host Code-V9BPW249
Click the button below to shop.

Watch the video tutorial below for step by step instructions or CLICK HERE.


Crumb Cake card base 5.5" x 8.5" scored at 4.25"
Night of Navy cardstock 4" x 5.25"
Beary Christmas DSP 3-7/8" x 5-1/8"
Basic White cardstock 1.25" x 3-5/8"

NOTE: If viewing this blog post from an email, CLICK HERE to view with full supply list.

Happening Now
♥ Shop Stampin' Up! HERE
♥ Sign Up for my Weekly Newsletter HERE
♥ Join My Team of Quitabug Stampers HERE
♥ Subscribe to Paper Pumpkin HERE

Shop Now Join my Team Paper Pumpkin Image Map

Saturday, October 28, 2023

Trick or Treat Book Box


Hey there! Happy Saturday! I enjoyed bringing you a project on Saturday a few weeks ago for WCMD, so I decided I might possibly make this a regular thing in the future.

I'm super excited about today's project!! It's something I've never made before, a book box. I had the idea because of my Murder She Wrote book club! I have a best friend in North Carolina who I do this weekly book club with and we had chosen this particular book for October because of it's Halloween theme. However, we haven't finished our last book so...looks like we won't start this one until November. I wanted to send her the book as a gift and I of course needed some cute packaging. I love that I can make my own gift boxes using Stampin' Up! products! In today's tutorial I share some tips on how I come up with measurements for custom boxes.

Host Code- GWWNZADV
Click the button below to shop.

Watch the video tutorial below for step by step instructions or CLICK HERE.


Box lid and base 6.5" x 9" scored at 1" on all 4 sides (see video for special tip scoring the base of the box)
Basic Black cardstock 3.75" x 6.25"
Them Bones DSP 3.5" x 6"


NOTE: If viewing this blog post from an email, CLICK HERE to view with full supply list.

Happening Now
♥ Shop Stampin' Up! HERE
♥ October Customer Order Gift HERE
♥ Sign Up for my Weekly Newsletter HERE
♥ Join My Team of Quitabug Stampers HERE
♥ Subscribe to Paper Pumpkin HERE

Shop Now Join my Team Paper Pumpkin Image Map