Quitabug Handmades- Home
Shop Now
Order 24/7
Join my Team
Paper Pumpkin
Classes and Events
Videos and Projects
Videos
Image Map
Showing posts with label hello card. Show all posts

Thursday, April 1, 2021

Hello Card Featuring Country Home


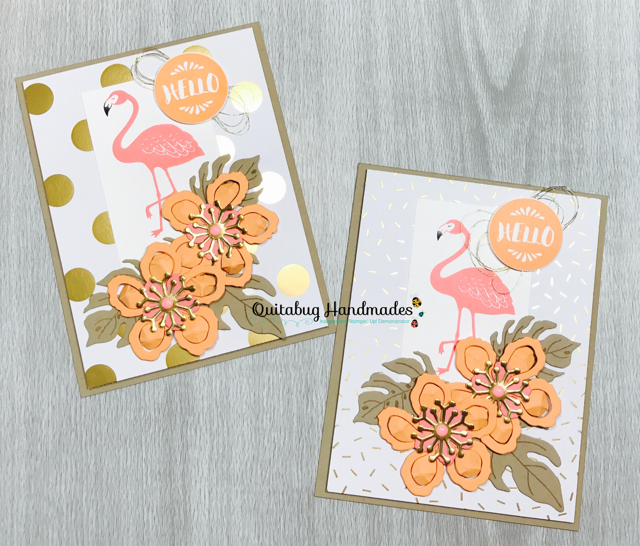
Hey there! I have a lovely new tutorial for you featuring the retiring Country Home stamp set. I decided to try and focus the month of April on products that are retiring as a way to get a little more fun out of them before they're gone. This stamp set doesn't have any coordinating dies or punches so I had to hand cut out the images. It's not my favorite thing to do but I did it. I think the card looks lovely. 

HOST CODE- ZW9GMKRJ
Click the button below to shop.

I actually CASE'd the idea for today's card from this one I found on the Stampin' Up! website. Which version do you prefer?

Watch the video tutorial below or CLICK HERE for step by step instructions.


Basic White thick card base 5.5" x 8.5" scored at 4.25"
Coastal Cabana layer 4" x 5.25"


NOTE: If viewing this blog post from an email, CLICK HERE to view with full supply list.

Happening Now
♥ Annual Catalog Retiring Sale HERE
♥ Sign Up for my Weekly Newsletter HERE
♥ Join My Team of Quitabug Stampers HERE
♥ Subscribe to Paper Pumpkin HERE

Shop Now Join my Team Paper Pumpkin Image Map

Friday, May 10, 2019

Oh, Hello Friend


Happy Friday! Today's project features the retiring Oh So Eclectic stamp set + Eclectic Layers Dies. I've really enjoyed this set. No matter how you use these lovely images they always make such beautiful cards and projects.


HOST CODE- M9GFHEMA 


Whisper White thick card base 4-1/4" x 11" scored at 5-1/2"
Whisper White 2-3/4" x 2-3/4"


Helpful Tips:
  • For the Lovely Lipstick flower, stamp the flower/stem image in Soft Sea Foam then stamp the individual flower image on top in Lovely Lipstick. 
  • For the Flirty Flamingo flower, stamp off in Flirty Flamingo ink (for a lighter shade). Then die cut the top layer out of Flirty Flamingo cardstock and adhere it to the stamped image using glue dots. 
  • Use one of the scalloped squares from the Layering Square Dies to die cut a piece of Silver Foil smaller than the Whisper White square. Adhere the silver scalloped square behind the Whisper White leaving just the bottom scallops peeking from behind the white square.


Note: If viewing this blog post in an email, CLICK HERE to see post with full supply list.


Happening Now:
♥ Everything Is Rosy - LIMITED-Time Product Medley CLICK HERE
♥ Retiring Products CLICK HERE
♥ Free Geared Up Garage Card Kit CLICK HERE
♥ May Host Gift CLICK HERE


Shop Now Join my Team Paper Pumpkin Image Map

Monday, July 30, 2018

Hello Card featuring Varied Vases


Happy Monday! I hope you all had a fabulous weekend. I am officially back from my Alaskan cruise with Stampin' Up! and man oh man was it AMAZING! I had an unforgettable time and made so many new memories! Thank you again for all of your love and support in helping me achieve this goal! I appreciate you all so much!


Now it's time to get out of vacation mode and get back to business.
I thought I would share a simple card series this week. I've designed three cards to showcase just how easy it is to make gorgeous cards with limited supplies. I hope you enjoy! ♥


HOST CODE- XWSJHJZU


Project Measurements
whisper white thick card base 5.5" x 8.5" scored at 4.25"
whisper white layer 3.75" x 5:
designer paper layer 1.5" x 4.25"


Helpful Tips:
  • Stamp the flowers in Coastal Cabana full strength. Then stamp off the filler image once before stamping over top the flowers. This will allow a lighter shade of Coastal Cabana to peek show through the flowers. 
  • When stamping your vase, be sure to stamp it upside down on your cardstock. This will make it much easier to punch out. 


For my Alaska swaps I substituted a single glitter dot in place of the ribbon. I had no interest in tying 26 bows using bakers twine, lol. I like to keep it simple when making multiples. I also cut the designer paper to 4" in order to get more pieces out of one sheet of 12 x 12.


Here is a picture of us (my honey and I) as we prepared to board this ship. Such an exciting day!


I'll share more pictures this week. I'm also working on a video for you all showing the entire experience.


Shop Now Join my Team Paper Pumpkin Image Map

Friday, May 5, 2017

Stampin' Up! Botanical Floral Flamingo Card


Today's project is absolutely gorgeous and makes me wish I was at the beach! I combined the Pop of Paradise stamp set with Botanical Blooms and what a gorgeous duo they make! The inspiration for this card began with my team color challenge this week:


These colors are amazing together!! I'll definitely be putting them to goo use on more projects in the future. Watch the video tutorial below for step-by-step instructions on making this card. 
Botanical Flamingo Card
Order 24/7 HERE


Project Supplies


Check out the Retiring Products HERE

Project Measurements
Crumb Cake card base 4.25" x 11" scored at 5.5"
Designer paper layer 4" x 5.25"
Whisper White layer 2" x 4"


Shop Now Join my Team Paper Pumpkin Image Map