Quitabug Handmades- Home
Shop Now
Order 24/7
Join my Team
Paper Pumpkin
Classes and Events
Videos and Projects
Videos
Image Map
Showing posts with label fall card. Show all posts

Wednesday, November 8, 2023

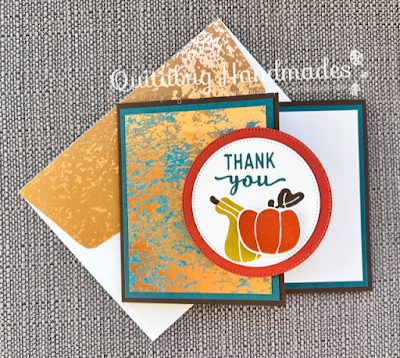
Thank You, Beyond Grateful


Hey there! I have a simple fun fold card idea to share with you today. This card is very easy to create and it also packs some "wow" 😍 factor with the fabulous Oxidized Copper Specialty Paper. I used the Pick of the Patch Bundle for the cute little pumpkins and found my sentiments in the Charming Sentiments stamp set.

Host Code-V9BPW249
Click the button below to shop.

Watch the video tutorial below for step by step instructions or CLICK HERE.


Early Espresso card base 4.25" x 11" scored at 5.5" 
(cut 2" off of card front- see video)
Pretty Peacock cardstock 4" x 5.25" and 3.25" x 4"
Basic White cardstock 3.75" x 5"
Oxidized Copper DSP 3" x 3.75"


NOTE: If viewing this blog post from an email, CLICK HERE to view with full supply list.

Happening Now
♥ Shop Stampin' Up! HERE
♥ Sign Up for my Weekly Newsletter HERE
♥ Join My Team of Quitabug Stampers HERE
♥ Subscribe to Paper Pumpkin HERE

Shop Now Join my Team Paper Pumpkin Image Map

Monday, September 12, 2022

Autumn Wishes

Hey there! I have a gorgeous fall card to share with you today featuring the new Fond of Autumn Bundle. I thought this botanical bouquet would look so striking when beautifully colored with Stampin' Blends on a white background...and...I was right! 😍 

Host Code- AB2DWUG7
Click the button below to shop.

Watch the video tutorial below for instructions or CLICK HERE.


Basic White Thick card base 4.25" x 11" scored at 5.5"
Basic White cardstock 4" x 5.25"
Soft Seafoam cardstock .5" x 2.5"

NOTE: If viewing blog post from email, CLICK HERE to view with full supply list below.


Happening Now
♥ Shop Stampin' Up! HERE
♥ September Ordering Gift HERE
♥ September Weekly Deals HERE
♥ Sign Up for my Weekly Newsletter HERE
♥ Join My Team of Quitabug Stampers HERE
♥ Subscribe to Paper Pumpkin HERE

Shop Now Join my Team Paper Pumpkin Image Map

Friday, November 5, 2021

You're Such A Blessing


Hey there! I have a simple fall themed card to share with you featuring the Love of Leaves stamp set + coordinating dies and the Little Delights stamp set (used for the sentiment). I've wanted the Love of Leaves stamp set and dies for a very long time. I'm so excited to finally have this set! I created this card for my teams October virtual swap. I also used this design for our October team make-n-take. If you send out fall cards, this design is quick and easy for creating multiples.

Host Code- SAD6USAC
Click the button below to shop.

Watch the video tutorial below for step by step instructions or CLICK HERE


Cajun Craze card base 4.25" x 11" scored at 5.5"
Soft Succulent layer 3.5" x 4.75"
Harvest Meadow layer 3.25" x 4.5"
Crumb Cake layer 1.5" x 4.25"

NOTE: If viewing this blog post from an email, CLICK HERE to view with full supply list.

Happening Now
♥ November Ordering Gift HERE
♥ Sign Up for my Weekly Newsletter HERE
♥ Join My Team of Quitabug Stampers HERE
♥ Subscribe to Paper Pumpkin HERE

Shop Now Join my Team Paper Pumpkin Image Map

Monday, November 5, 2018

Painted Harvest Pumpkins


Happy Monday! Today I have fabulous fall card for you. I combined the Painted Harvest stamp set with the Toil & Trouble Designer PaperI was really unsure about the color combination at first but I absolutely love it for this card.


HOST CODE-RA32U234


This was my Quitabug Stampers team color challenge for last week. And it was definitely a challenge at first. I've found that using designer paper is the best when struggling to find color combinations or get inspiration for one. So, that's what made me pull out these pumpkins!


Project Measurements
Pumpkin Pie card base 5.5" x 8.5" scored at 4.25"
Soft Sea Foam layer 4" x 5.25"
Designer paper layer 3.75" x 5"


Helpful Tips:
  • To save on cardstock, die cut the Soft Sea Foam scallop circle from the center of the Soft Sea Foam cardstock layer. Then adhere your pumpkin pattern on top. No one will ever know a piece is missing. ☺ 
  • Wrap a single piece of Tea Room ribbon around your layered cardstock and paper. Cut a second smaller piece, tie it in a bow, and adhere it with a glue dot. This makes it easier to tie a pretty bow and still gives the appearance that only one length of ribbon was used.
  • Add a focal piece by hand cutting pumpkins from the designer paper using Paper Snips. Adhere the pumpkins with dimensionals to make them pop!


Shop Now Join my Team Paper Pumpkin Image Map