Quitabug Handmades- Home
Shop Now
Order 24/7
Join my Team
Paper Pumpkin
Classes and Events
Videos and Projects
Videos
Image Map
Showing posts with label embossing. Show all posts

Tuesday, December 10, 2019

Die Cutting & Embossing Machine Accessories


Happy Tuesday! I'm excited to announce that as we wait for the release of our new die cutting machine, we now have Die Cutting Plates you can purchase to use with your current die cutter and the one to come! Woohoo! 

I was in need of new plates and I'm so excited that we have them again.

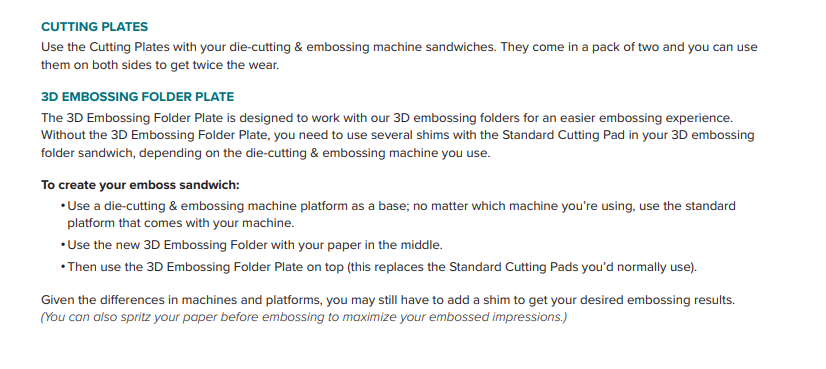
If you haven't already purchased the 3D Embossing Folder Plate, it is designed for use with our 3D Embossing Folders to help give you an easier embossing experience with the best embossed image.

Purchase Cutting Plates HERE.
Purchase 3D Embossing Folder Plate HERE.

HOST CODE- 6VY3JKP3

Happening Now
♥ December Host Gift HERE
♥ SHOP the Christmastime Suite HERE
♥ FREE Beautiful Friendship Card Kit HERE
♥ Sign Up for my Weekly Newsletter HERE
♥ Join my team of Quitabug Stampers HERE


Shop Now Join my Team Paper Pumpkin Image Map

Monday, May 29, 2017

Stampin' Up! Floral Fresh Fruit Card


I am so going to miss the Fresh Fruit stamp set! I don't know what it is but I just love fruit stamp sets! I decided to use this set once more because I realized I never used this big beautiful flower image. Only 3 days left for Retiring Products. The new catalog  launches on June 1st.  

This week I challenged my team of Quitabug Stampers to share a project using any kind of embossing. This is the card I shared. Did you know you can emboss any of our ink colors using clear embossing powder?! How awesome is that! Simply stamp in any of our ink colors and pour the clear embossing powder on immediately, while the ink is wet. Then heat it with your heat tool and you have a beautiful embossed image! 

Project Supplies


Project Measurements
Peekaboo Peach card base 5.5" x 8.5" score at 4.25"
Watermelon Wonder 3.25" x 4"
Designer Paper 3" x 3.75"
Gold Foil 1" x 4"


Shop Now Join my Team Paper Pumpkin Image Map

Thursday, March 23, 2017

Stampin' Up! Sunburst Sayings Unlidded Box Desk Organizer


LOVE, LOVE, LOVE this box! I was in need of a storage solution for some of my most frequently used tools and decided, why not make my own storage container? I just love everything about this box and it's absolutely perfect for what I needed! 


Unlidded Box Desk Organizer 


Project Supplies


Project Measurements
Box base 8" x 8"
Score at 2" and 6" rotate counter clockwise and score at 3" and 5"


Are you on Facebook? Like my Facebook page HERE


Shop Now Join my Team Paper Pumpkin Image Map

Monday, March 20, 2017

Stampin' Up! Hello Copper Embossed Card


I love a good WOW card that's easy to make! This card has so much detail but comes together quite quickly. The copper embossing really makes this card stand out!


Project Supplies


Project Measurements
Mint Macaron card base 5.5" x 8.5" scored at 4.25"
Mint Macaron layer 4" x 5.25"
Moroccan designer layer 2" x 5"
Whisper White layer 3" x 3"


The leaves were stamped full strength in Mint Macaron on Mint Macaron cardstock to create a tone-on-tone look. For the Whisper White layer the leaf images was stamped off a few times and stamped full strength on top for a nice layered effect. 


The splatter image from the Gorgeous Grunge stamp set was embossed with copper on both the card and the envelope. How cool is that!!


A loop of copper thread behind the sentiment and a tiny basic black bow finish off this gorgeous card. Love it!


What do you think? Leave a comment below. 


SHOP NOW


FREE Card Kit: Beautiful You


SUBSCRIBE to my Newsletter!


Shop Now Join my Team Paper Pumpkin Image Map

Thursday, November 24, 2016

Stampin' Up! Cookie Cutter Thanksgiving Treat Bags


Happy Thanksgiving!

One final project for you all today, Thanksgiving treat bags. I shared these adorable goodie bags with a wonderful group of friends last night and they were a hit! Enjoy!

I wish you all a very Happy Thanksgiving...I'm truly grateful for each of you!

Cookie Cutter Thanksgiving Treat Bags Tutorial


Project Supplies


Project Measurements
Designer Paper layer 1.5" x 12"


Shop Now Join my Team Paper Pumpkin Image Map

Monday, December 14, 2015

Stampin' Up! Embossed Flurry of Wishes Card


Happy Monday! 

Nothing better than starting a new week with a lil' bit of stampin'! For today's project, I have a fun Christmas card featuring embossing. I know embossing can seem time consuming but in today's tutorial I'll show you just how quick and easy it can be! Enjoy!

Please let me know if you have any questions...and remember, you can purchase any of the product used for this project by visiting my Online Stampin' Up! Store


Best Wishes,
LaQuita

Tuesday, July 21, 2015

Weekly Deals: July 21st-27th

Happy Tuesday! I have some fantastic new Weekly Deals to share with you! I added the Fun Frames Textured Impression Embossing Folders to my wish list. These embossing folders look amazing! What's on your must have list from this week's deals?

Built for Free Using: My Stampin Blog

Don't forget to check out the CLEARANCE Rack too!

Happy shoppin' and happy stampin',
LaQuita

Friday, July 3, 2015

Stampin' Up! Fabulous Four Card

Hello everyone! I'm sharing my first Stampin' Up! card video with you today. Yay! I designed this card for the first card swap I'm participating in on my Stampin' Up! team with  Robyn from My Pink Stamper. I had such a fun time making this card and I love that it was quick and simple.  Below the video is a complete list of the Stampin' Up! products used to complete this design. Don't forget to leave me a comment below...I'd love to hear from you. Enjoy! :)


Built for Free Using: My Stampin Blog

Sunday, June 14, 2015

Double Inked Letter Press Effect


I stumbled upon the coolest technique online and decided to try it. The result was so awesome I had to share it with you. The great thing about creating this effect is it doesn't require many materials. 

I started the process by inking the smooth interior side of an embossing folder in moss green. 

After it was inked up, I laid my white cardstock (4" x 5.25") inside of the embossing folder and ran it through my Texture Boutique (you can use any embossing device). This is how you achieve the letterpress effect. When I removed the white cardstock from the embossing folder it revealed a beautiful raised impression embedded with moss green ink! 

Double inking time! I used the Iris ink pad to add contrasting color to the raised embossing. Using light pressure, I dabbed and gently slid the ink pad across the surface of the raised impression. I just love the way these two colors play off of each other.
                         
I had originally planned to just try out the techique...but...the effect was just too dang on amazing! I had to incorporate it into a card. After some stamping, hand punched and die cut flowers, I love the finished product! What do you think?
I hope this technique tutorial leaves you motivated to try something new! See you soon! :)