Quitabug Handmades- Home
Shop Now
Order 24/7
Join my Team
Paper Pumpkin
Classes and Events
Videos and Projects
Videos
Image Map
Showing posts with label color challenge. Show all posts

Wednesday, September 7, 2022

You Make A Difference


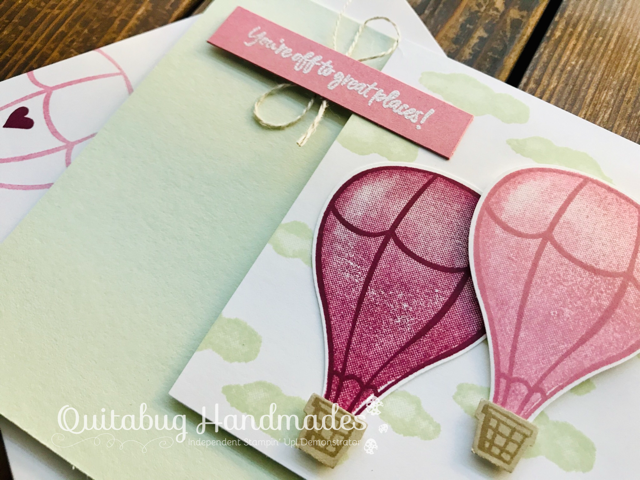
Hey there! It's been a busy week and it's only Wednesday BUT I'm so excited to have a new tutorial for you today! Today's card features the Begin With A Dream Host Stamp Set. This set is available for redemption using your Stampin' Rewards when you place a qualifying order in my Online Store. I did some clean and simple color blocking on this card and I'm really loving it! I definitely want to give color blocking another go and try some different layouts.

Host Code- AB2DWUG7
Click the button below to shop.

Watch the video tutorial below for instructions or CLICK HERE.


Basic White Thick card base 5.5" x 8.5" scored at 4.25"
Basic White cardstock 4" x 5.25" (x2) and 2" x 4"
Sahara Sand & Petal Pink cardstock 1.75" x 5"
Pool Party cardstock 1/2" x 2.5"

NOTE: If viewing blog post from email, CLICK HERE to view with full supply list below.


Happening Now
♥ Shop Stampin' Up! HERE
♥ September Ordering Gift HERE
♥ September Weekly Deals HERE
♥ Sign Up for my Weekly Newsletter HERE
♥ Join My Team of Quitabug Stampers HERE
♥ Subscribe to Paper Pumpkin HERE

Shop Now Join my Team Paper Pumpkin Image Map

Monday, August 9, 2021

Merry Christmas


Hey there! I know...Christmas in August?! I don't normally make Christmas cards this early, but I needed an idea for my recent team color challenge (Blackberry Bliss, Fresh Freesia, and Pear Pizzazz) and for some reason I grabbed this set. I was a little apprehensive about these colors for a Christmas card but I am loving how it came out. The colors totally work! What do you think?

HOST CODE- U39AXREJ
Click the button below to shop.

Watch the video tutorial below for step by step instructions or CLICK HERE.


Blackberry Bliss card base 5.5" x 8.5" scored at 4.25"

NOTE: If viewing this blog post from an email, CLICK HERE  to view with full supply list.

Do you decorate the inside of your cards? I don't usually. I mainly stamp the inside of if I'm making Christmas, Thanksgiving, or Birthday cards. I kind of like the stamped inside though...I may have to do it more often.


Happening Now
♥ August Ordering Gift HERE
♥ Sign Up for my Weekly Newsletter HERE
♥ Join My Team of Quitabug Stampers HERE
♥ Subscribe to Paper Pumpkin HERE

Shop Now Join my Team Paper Pumpkin Image Map

Monday, July 26, 2021

Love you, friend!


 Hey there! I took a few weeks off to enjoy some time with my little family and enjoy my birthday month! I'm happy to be back with a new tutorial for you. I actually filmed this tutorial at the beginning of July. This card was designed for my teams color challenge. We needed to create and share a project featuring Pacific Point (I never really use this color), Balmy Blue, and Crushed Curry. I thought this was going to be a difficult combo but this card came together quite quickly.

HOST CODE- U39AXREJ
Click the button below to shop.

Watch the video tutorial below for step by step instructions or CLCIK HERE.


Basic White Thick card base 4.25" x 11" scored at 5.5"
Crushed Curry layer 3-3/8" x 4-5/8"
Pacific Point layer 3.25" x 4.5"

NOTE: If viewing this blog post from an email, CLICK HERE to view the full supply list.

Happening Now
♥ July Ordering Gift HERE
♥ Sign Up for my Weekly Newsletter HERE
♥ Join My Team of Quitabug Stampers HERE
♥ Subscribe to Paper Pumpkin HERE

Shop Now Join my Team Paper Pumpkin Image Map

Sunday, December 13, 2020

Kick Up Your Heels with Zany Zebras


Hey there! I have a super quick and simple project tutorial to share with you today! Last week, on my team of Quitabug Stampers, our color challenge was to share a project idea using Granny Apple Green, Poppy Parade, and Bermuda Bay. I decided I wanted to do something very simple using the Zany Zebras stamp set. This set is just so cute!

HOST CODE- QY3A2PWG
Click the button below to shop.
 

Color Challenge:

Watch the video tutorial below for full instructions or CLICK HERE.


Granny Apple Green card base 8.5" x 5.5" scored at 4.25"
Brights DSP 3" x 3.75"
Bermuda Bay sentiment .5" x 1.75"


NOTE: If viewing this blog post from an email, CLICK HERE to view with full supply list.
Happening Now
December Host Code Gift HERE
♥ Shop Year End Sale/Retiring List HERE
♥ Shop Clearance Rack HERE
♥ Sign Up for my Weekly Newsletter HERE
♥ Join My Team of Quitabug Stampers HERE
♥ Subscribe to Paper Pumpkin HERE

Shop Now Join my Team Paper Pumpkin Image Map

Tuesday, May 19, 2020

You're Off to Great Places!


Hey there! I have a cute project idea for you featuring the retiring Above the Clouds Bundle. A couple of weeks ago, we had a team color challenge using Merry Merlot, Soft Sea Foam, and Rococo; this is the card I created for the challenge.

HOST CODE- B6QGFVD4
Click the button below to shop.


Soft Sea Foam card base 5.5" x 8.5" scored at 4.25"
Whisper White layer 3" x 3.5"
Rococo Rose sentiment cut down to size


Helpful Tips:
  • Stamp the balloon line image, onto Whisper White cardstock, using Rococo Rose and Merry Merlot ink. Stamp off once to create a light shade using the filler image for each balloon.
  • Adhere the Merry Merlot balloon flat and pop up the basket using a mini dimensional. Pop up the Rococo Rose balloon and basket.
  • Stamp the sentiment in Versamark ink, cover with White Stampin' Emboss Powder and heat set using the Stampin' Heat Tool.

NOTE: If viewing this blog post from an email, CLICK HERE to view with full supply list.


Happening Now
 Last Chance Retiring Products HERE
♥ Sign Up for my Weekly Newsletter HERE
♥ Join my team of Quitabug Stampers HERE
♥ Subscribe to Paper Pumpkin HERE


Shop Now Join my Team Paper Pumpkin Image Map

Thursday, August 23, 2018

Simple Joys of the Season


Happy Thursday! I have a beautiful holiday card to share with you today. I think this is the earliest I've ever made a Christmas project, ever! Crazy to already be thinking about the holidays. Time goes by so fast...sigh...

This week my teams color challenge was to use Shaded Spruce, Pool Party, and Merry Merlot. I thought these colors would come together well for a Christmas card. I pulled out the lovely Christmas Pines stamp set + Pretty Pines thinlit dies for this card. I'm definitely love'n the clean simplicity of this card. Clean and simple is my new jam!☺


HOST CODE- 2RVBT7F4


Project Measurements 
Whisper White thick card base 5.5" x 8.5" scored at 4.25"
Merry Merlot layer 3-1/8" x  4-1/8"
Whisper White layer 3" x 4"


Helpful Tips:
  • On your whisper white cardstock, ink up the less bold pine image in pool party. Stamp it off on scratch paper and then stamp it on your whisper white. Do this several times to create a light background on this layer.
  • Loop gold metallic thread behind your sentiment to add a pop of shine and elegance.
  • Jazz up your envelope flap with some designer paper (Under the Mistletoe). 


_____________________________________________________________________________


Good news: Bonus Days are back!
Here’s how it works: For every $50 you spend in myOnline Store from August 1–31 (before shipping and tax), earn a $5 Bonus Days coupon code that can be redeemed September 1–30.

*No limit to the number of coupons you can earn or redeem.


HOST CODE- 2RVBT7F4


Shop Now Join my Team Paper Pumpkin Image Map

Tuesday, April 24, 2018

Here's to Celebrating You


Happy Tuesday! I'm excited to share today's project with you! I just love the color combo so much. Last week my teams color challenge was to use Bermuda Bay, Flirty Flamingo, and Night of Navy. Such fun colors together. I decided to use one of my favorite stamp sets from the occasions catalog, Perennial Birthday.


HOST CODE- F264V2PY


Perennial Birthday Stamp Set- ORDER HERE


Helpful Tips:
  • Stamp the single flower image on a scrap piece of Whisper White card stock in Flirty Flamingo ink. Punch the flower images out using the 1" circle punch. Pop the images up using dimensionals to add some depth.
  • Wrap bakers twine around your card stock layers several times. Tie the twine in a bow.


Project Measurements
Night of Navy card base 4.25" x 11" scored at 5.5" 
Flirty Flamingo layer 4" x 5.25"
Whisper White layer 3.75" x 5"
Designer paper layer 2" x 5"


Shop Now Join my Team Paper Pumpkin Image Map

Monday, December 4, 2017

Best Day Ever Blossom


Measurements:
card base 5.5" x 8.5" scored at 4.25"
embossed layer 4" x 5.25"


Today's project was inspired by my team's color challenge last week:


This combo doesn't look like much at first glance but when I started creating the card I loved the way the colors complimented one another. The hint of daffodil really stands out and pops!

HOST CODE- Q3KPPP2E

I used the 3D Layered Leaves embossing folder to complete the floral look.


Shop Now Join my Team Paper Pumpkin Image Map

Wednesday, August 23, 2017

Pansy Punch Thank You


I love today's card because it features some fun colors and uses one of the very first stamp sets I got when I became a Stampin' Up! demonstrator, Flower Shop

HOST CODE- G7AS4267

Shop Stampin' Up! HERE 

I designed this card for my teams color challenge this week.

Stampin' Up! Color Inspiration

Project Measurements
Basic Gray card base 5.5" x 8.5" scored at 4.25"
Basic Gray layer 3.75" x 5"


Helpful Tips:
  • When adding layers the same color as your card base, ink the edges in the coordinating ink color to add easy dimension to the layer.
  • Heat emboss in white to help the sentiment pop on darker cardstock. 

Project Supplies


Thanks for stopping by!


Shop Now Join my Team Paper Pumpkin Image Map