Quitabug Handmades- Home
Shop Now
Order 24/7
Join my Team
Paper Pumpkin
Classes and Events
Videos and Projects
Videos
Image Map
Showing posts with label card set. Show all posts

Monday, January 28, 2019

Simple Stamping with Hey Love


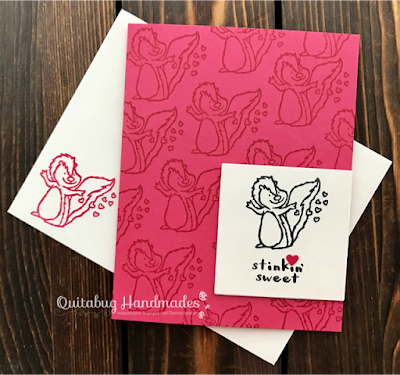
Happy Monday! I wanted to share some #simplestamping with you today featuring one of my favorites, Hey Love. It doesn't take much to create something cute and thoughtful...just some stamps, ink, and paper. This set of simple valentines would be perfect if you're just getting started with stamping. The repeated background on each card is a great way to practice putting ink to paper using stamps.


HOST CODE- BYFYMPF2


Project Measurements
Card base 5.5" x 8.5" scored at 4.25"
Whisper White 2.5" x 2.5"


Helpful Tips:
  • Background stamping- Starting in the upper left-hand corner, stamp the image at a diagonal across the card front. Repeat this all over the card front until all gaps are filled in.


NOTE: I used the Cookie Cutter Builder Punch to punch out the tiny Melon Mambo heart on each card.


Happening Now...

♥ Sale-A-Bration CLICK HERE for details
♥ Join My Team of Quitabug Stampers CLICK HERE for details
♥ Free Card Kits & Online Classes CLICK HERE for details

Shop Now Join my Team Paper Pumpkin Image Map

Saturday, December 3, 2016

November 2016 Paper Pumpkin- Wonderful Winterland


Happy Saturday!

I finally had the chance to open my November Paper Pumpkin kit and I love it! These mini cards feature soft winter blues, lots of dimension, and bits of sparkle! I filmed a quick video to give you a close up, check it out below. If you’re interested in subscribing click HERE.

Learn more about Paper Pumpkin HERE.

November 2016 Paper Pumpkin Tutorial


Additional Subscription Options


Shop Now Join my Team Paper Pumpkin Image Map

Sunday, November 13, 2016

Stampin' Up! Reindeer Christmas Card Set


Happy Monday!

I hope you all had a fabulous weekend! I know many of you look forward to my Stampin' Up! Saturday tutorial, but this weekend I decided to take Saturday off to spend time with family. It was well worth the time off. My honey works over the road and was able to be home for just one day this week. I was able to spend most of Sunday in my craft room working on fun projects to share with you all. 

I finally got to play around with the Cookie Cutter Christmas stamp set. I was a huge fan of the Cookie Cutter Halloween set, so I'm hoping to be equally as inspired by this one. I came up with these cute, quick, and simple Christmas cards. 


Project Supplies
Each card base was cut 5.5” by 8.5”, scored at 4.25”. I stamped the snowflake image, from the Christmas Pines stamp set, in the background using Mint Macaron ink.


I layered a piece of the Presents and Pinecones Designer Series Paper (2” x 4.25”) on top of Cherry Cobbler cardstock (2.5” x 4.25”).


A fun holiday greeting was stamped from the Presents and Pinecones stamp set using Emerald Envy Ink. The cute reindeer were stamped in Early Espresso ink on Crumb Cake cardstock and punched out using the Cookie Cutter Builder Punch.


 Six loops of Gold Metallic Thread was placed in some adhesive on the designer paper. Dimensionals were placed on the back of each reindeer before adding them on top of the metallic thread. To finish off these adorable cards, I used the leg portion of the builder punch to cut out a sparkly nose for each reindeer using Red Glimmer Paper. 
_______________________________________________________________

I was able to snap a quick picture before we headed off to a late lunch on Saturday...


Thanks for stopping by and I’ll speak to you soon!


Shop Now Join my Team Paper Pumpkin Image Map

Saturday, September 10, 2016

Stampin' Up! Saturday- Fresh Fruit Peach Mini Cards


Happy Saturday!

I have a super cute project for you today! This project was inspired by the 3x3 mini card featured on page 148 of the Annual Catalog. I love the Fresh Fruit suite and was so excited to use this stamp set on another project. I ended up turning the mini card into a set perfect for gift giving. I'll show you an idea for this next Saturday, so be sure to stop by. I've listed all of the supplies and measurements for today's project below. Enjoy!

Fresh Fruit Peach Mini Cards Tutorial 
ORDER 24/7: www.quitabughandmades.stampinup.net


Project Supplies


Project Measurements
Mini Cards
Peekaboo Peach base 3" by 6" scored at 3"
Fresh Fruit DSP 2.75" square
Whisper White layer 2.5" square

Envelopes
Fresh Fruit DSP 5.25" square, punch/score at 2 5/8" on all four sides


If you have any questions, leave me a comment below. 

See you soon...

Shop Now Join my Team Paper Pumpkin Image Map